I recently decided to start experimenting with aeroponics and hydroponics. My first project is a small aeroponics cloning system that uses an ultrasonic atomizer to bathe the plant roots in a nutrient fog.
Features
I wanted to make sure my prototype system is:
- easy to assemble
- inexpensive
- built using widely-avaialble commodity hardware
- portable: easily carried when full; 1 gallon of water weighs about 8.5 lb
- self-contained: can be placed anywhere and easily horizontally scaled
I’d like to add these features eventually:
- fail-safe during power outages
- can be connected to a larger reservoir/filter/UV disinfectant system
lighting
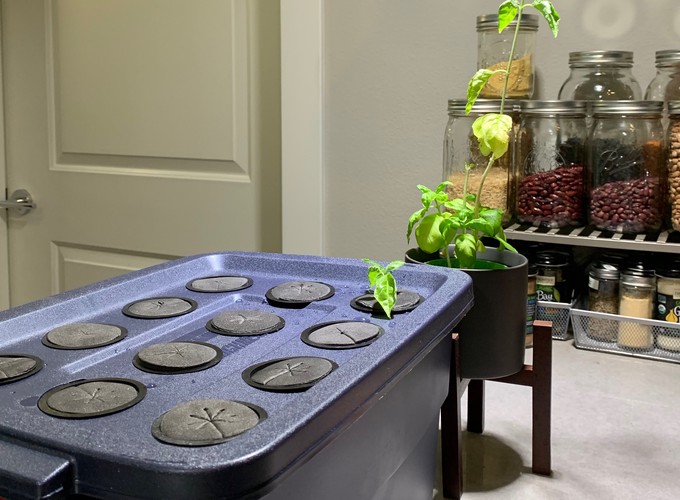
As currently constructed, the tote can sit on the shelf of a wire rack, and a cheap shop light clamp can hold a 10w LED grow light. The plants are using existing overhead lighting, which is a 15w full-spectum Sansi LED grow bulb mounted about 2.5 feet above the canopy. It’s possible that neither plant is getting enough light, as evidenced by the stretched “parent” basil plant behind the cloner.
Progress
At installation
The first cutting was from a basil plant that I had rooted in unmodified tap water for about a week. Note the white roots.
After the first day
After one overnight of continuous running – about 18 total hours – the roots of the basil clone had turned from white to brown.
I noticed the bottom roots had actually been submerged in the water, which was too high. The reservoir also had a slightly off smell, which I’m assuming is due to bacterial growth. I discarded the existing water, washed the reservoir with soap, and filled it back with 18 cups of water. I rinsed off the roots of the cutting before putting it back into the cloner.
There are no nutrients in the reservoir yet. I’m still researching what kind to buy – NPK ratios and such – or whether to use some of the small container of nutrient solution that came with my Windowgarden years ago.
Lessons learned
The reservoir system is effectively sealed, preventing any air exchange with the air outside. This probably contributed to the “off” smell, assuming that was from anaerobic bacterial growth. The air pump and airstone are meant to combat this.
Filling to the line visible in the reservoir was convenient, but the resulting water level ended up submerging some of the roots.
The higher water level also required the atomizer to be mounted to the top of a net pot that needed to be weighted down with pebbles.
Using only 1 gallon of nutrient solution allows the atomizer to be attached directly to the airstone inlet, which results in the manufacturer-recommended 2-3 mm of clearance below the water level. This leaves plenty of air space for the roots to dangle.
Technical details
Parts list
The parts below total roughly $50 if you need to purchase all of them.
- 3 gallon Rubbermaid tote
- aquarium pump
- 1⁄4” air tubing
- airstone
- atomizer/fogger
- (12) 2” net pots
- (12) 2” neoprene sleeves
- interval timer
Tools needed
- drill
- 2” hole saw with arbor
- 1⁄8” drill bit for pilot holes; choose a size that allows the hole saw arbor to start drilling without jumping around
- scissors, knife, or sharp pruning shears to cut the bottom of the net pot
- pH testing kit or pen meter
- pH Down solution
How to build it
- Mark the tote lid for 12 holes on 3” centers. You can create a paper template to make this process easier.
- Drill a pilot hole for each opening.
- Drill a 2” hole, running the drill backwards to prevent the hole saw from binding and create a cleaner cut.
- Remove any dangling shavings that could fall off and end up in the reservoir, clogging the atomizer.
- Zip-tie the atomizer to the airstone input.
- Add 1 gallon of nutrient solution.
- Adjust pH as needed to fall within the range of 5.5 to 6.5.
- Push a 2” neoprene sleeve into each 2” net pot until it’s flush with the net pot lip.
- Cut out the bottom of each net pot to allow the clones to be more easily removed from the net pots.
- Fill all 12 holes with “plugged” net pots even if they don’t yet contain a cutting. This will prevent any water from splashing out of the reservoir.
pH management
My tap water is 7.0 pH. To 18 cups of water (144 fl oz), I added 0.5 mL of pH Down. This resulted in a pH of 6.0.
It should take about 0.44 mL for 16 cups (1 gallon) of water.
)